BLOG POST
If you're starting a business or have never gotten serious about online reviews, the whole Google reviews thing can feel more complicated than it needs to be. Where do reviews actually come from? How do customers leave them? Do you need a Google account, a Gmail address, a website? What's the difference between Google Business Profile and Google My Business and Google Maps and Google Search? Customers who leave reviews are often part of the Google Local Guide levels and rewards system, which incentivizes them to contribute. Many of your most valuable reviewers are experienced contributors, so it's worth understanding how the Google Local Guide program works — badged Local Guides write longer, more credible reviews that carry extra weight in Google's snippets.
The reality is simpler than the jargon suggests. Setting up Google reviews for your business takes about two hours of focused work, mostly waiting on a verification step Google handles in the background. Once you're set up, the same infrastructure works for the next 10 years — you don't have to redo any of it.
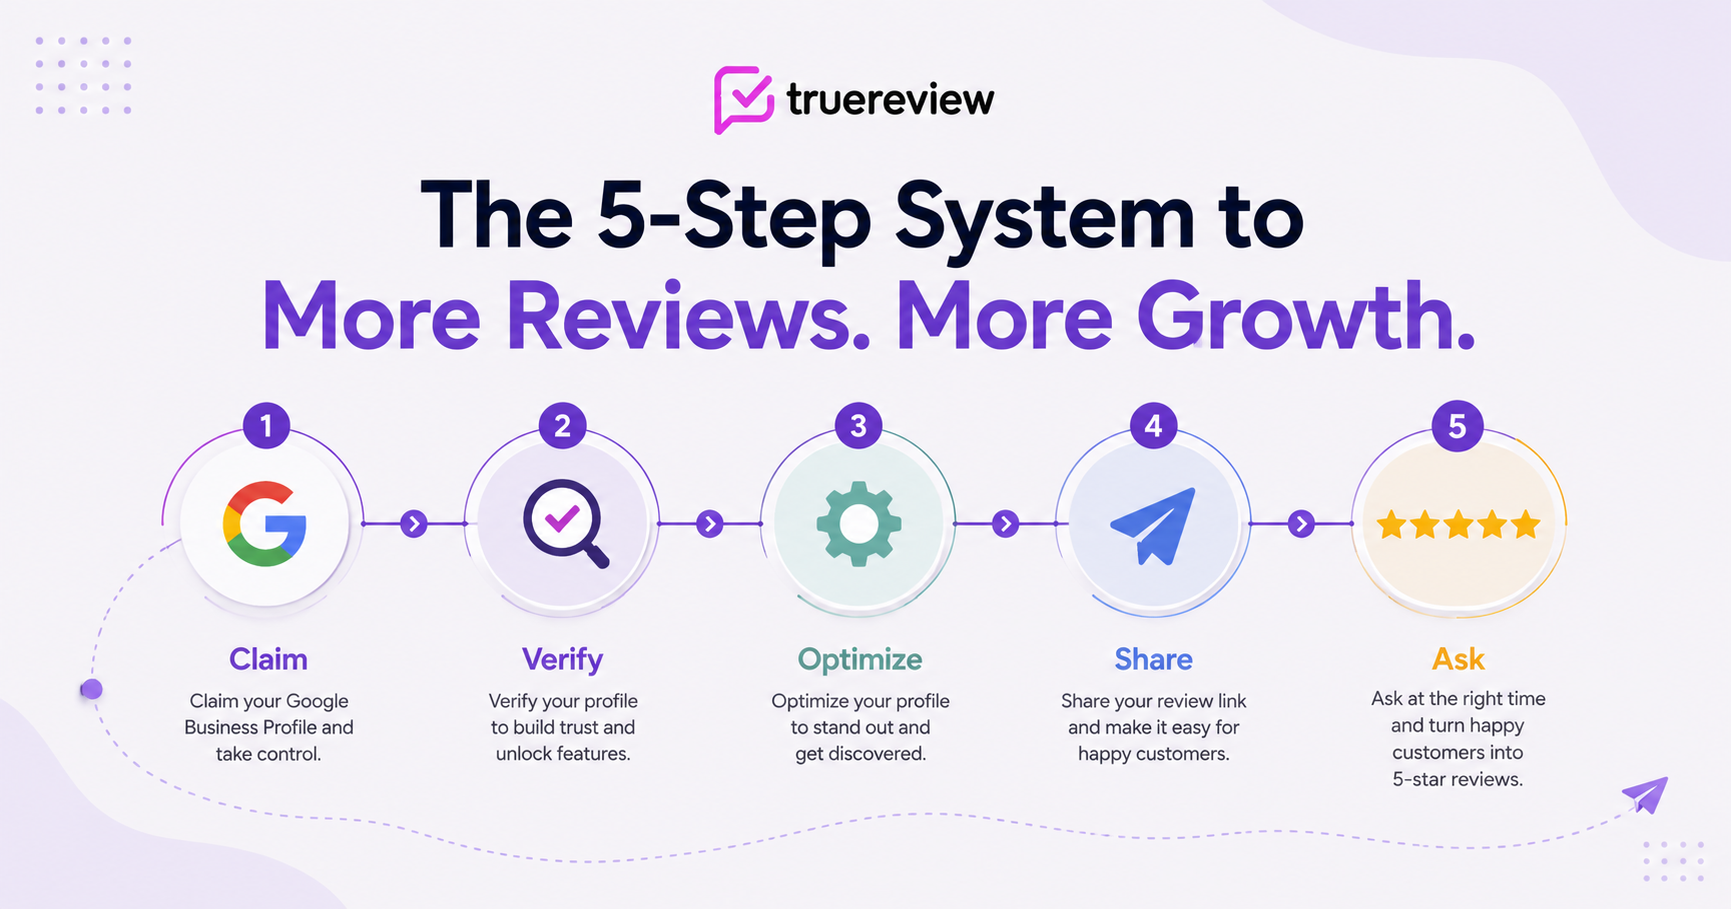
This guide walks through every step in order: claiming your Google Business Profile, verifying it, optimizing it for review collection, getting your direct review link, sharing that link with customers, and setting up a workflow that keeps reviews coming in consistently. By the end, you'll have a fully working review system you can actually deploy.
A small definitional housekeeping moment, because the naming around Google's tools genuinely confuses people.
Google Business Profile (GBP) is the free listing your business gets on Google. It's what shows up when someone searches for your business name, when they search for "[service] near me," and when they look at the map results. Reviews appear on this profile.
Google Business Profile used to be called Google My Business (GMB) until 2021 — and you'll still see the old name everywhere on the internet. They're the same thing.
Google Maps and Google Search are how customers find your profile. Both display the same Google Business Profile information, including reviews.
Google reviews are reviews left on your Google Business Profile. They show up wherever your profile appears — Search, Maps, the local 3-pack, the Knowledge Panel.
That's all you need to keep straight. Everything else is jargon.
This is where every Google review program starts. If you don't have a Google Business Profile, customers can't leave Google reviews — even if they want to.
There are three possible starting points:
You don't have a profile at all. Most likely if your business is new. Go to google.com/business or search "Google Business Profile" and start the creation flow. Google will walk you through entering your business name, category, address (or service area for businesses without a storefront), phone number, and website.
You have a profile but haven't claimed it. This happens when Google auto-creates a profile based on third-party data (Yelp listings, Better Business Bureau records, government registrations). The profile exists but you don't control it. Search for your business on Google. If a profile shows up with a "Claim this business" or "Own this business?" link, click it and start the claim flow.
You have a profile and someone else is claiming it. If you find a profile that's already been claimed by someone you don't recognize, you'll need to go through Google's ownership dispute process. This takes longer (sometimes weeks) and requires documentation proving you're the legitimate business owner. Annoying but resolvable.
A few specifics worth getting right at this step:
After you create or claim your profile, Google needs to verify you're the legitimate owner. This is the step that takes the most patience because Google controls the timeline.
The verification methods Google uses include:
Which method you get is something Google decides — you don't always have a choice. Whatever you get, follow the instructions exactly. Profiles that fail verification multiple times can be flagged.
While you're waiting for verification, you can still complete the rest of your profile setup. Reviews can't appear on the profile until verification is complete, but everything else can be ready to go.
A complete, optimized Google Business Profile gets dramatically more visibility — and dramatically more reviews — than a thin one. Google's algorithm rewards completeness, and customers reading your profile are more likely to leave reviews on a profile that already feels active and legitimate.
The elements that matter most:
Business description. A few sentences explaining what you do, who you serve, and what makes you distinct. Don't keyword-stuff. Write for humans.
Categories. Your primary category is the most important. Add relevant secondary categories (a hair salon might add "Hair extensions specialist," "Beauty salon," "Hair coloring service"). Don't overdo it — categories should genuinely reflect your services.
Hours. Accurate, including special hours for holidays and seasonal changes. Customers and Google both penalize wrong hours.
Photos. Real photos of your business — interior, exterior, products, services, team. Aim for at least 10-15 high-quality photos at launch and a few new ones each month afterward. Profiles with current photos consistently outperform profiles with stale or sparse photo collections.
Products/Services. Use the dedicated services and products fields if your category supports them. This both helps customers and gives Google additional context about what you do.
Q&A. The Q&A section can be seeded with common questions and answers. This both serves customers searching for information and signals to Google that the profile is actively managed.
Posts. Google Posts are short updates (announcements, offers, events, new products) that appear on your profile. Active posting signals an active business. Aim for 1-2 posts per week, even if they're brief.
A complete profile takes 60-90 minutes to set up well. The investment is worth it — incomplete profiles consistently underperform on both search visibility and review velocity.
This is where most businesses get stuck, because Google doesn't make the review link super obvious. Once you have it, though, you can use it forever.
The direct method (if you have GBP access):
g.page/r/CdL...../review or similar.This is your direct review link. Bookmark it; you'll use it constantly.
The Place ID method (if you don't have GBP access yet, or want a different format):
If you're still waiting on verification or someone else manages your profile and you can't access the dashboard, you can still generate a review link using your Place ID. We covered this in detail in our companion post on creating a review link without profile access. The short version: find your Place ID using Google's Place ID Finder, then build a URL in this format: https://search.google.com/local/writereview?placeid=YOUR_PLACE_ID.
Either method produces a link that, when clicked on a phone or computer with a Google account signed in, takes the customer directly to the review form for your business. One tap. Done.
A note on URL formats: Google sometimes provides multiple link formats that all work. The shortest, cleanest one is what you want for SMS messages where every character counts. Test the link yourself before deploying it widely — open it on your phone, make sure it goes directly to the review form for your business, and confirm it doesn't redirect through any landing pages.
A direct review link is only useful if customers actually see it. The methods we cover in detail in our post on the seven proven methods for requesting Google reviews all start with having this link in hand.
The starter set most new businesses can deploy in a single afternoon:
These five together cost essentially nothing and start generating ambient review requests from day one.
Passive review prompts (email signatures, QR codes, receipt footers) generate some volume on their own. But the real review velocity comes from actively asking customers — by SMS or email, shortly after they've had a positive experience.
A simple manual workflow that works for most new businesses:
For each completed transaction:
Templates that work:
Hi {First Name}, thanks for choosing {Business Name}! If you have a moment, we'd appreciate a Google review: {Review Link}
For a deeper template library across SMS, email, in-person scripts, and post-purchase prompts, see our companion post on 25+ review request templates and scripts.
A few principles that apply across every ask:
Once reviews start coming in — usually within the first week of asking — you need to be watching for them and responding. Reviews you don't respond to look worse than reviews you do, and customers reading your profile pay attention to how you handle conflict.
The minimum monitoring setup:
Enable Google notifications. In your Google Business Profile dashboard, turn on email notifications for new reviews. This gets you a notification within minutes of a new review being posted.
Check your profile regularly. Even with notifications on, log into your dashboard at least once a week to scan for reviews you might have missed.
Have response templates ready. A short template for positive reviews ("Thanks so much, {Name}! We appreciate you taking the time.") and a more careful template for negative reviews ("Thank you for sharing your feedback. We'd welcome the opportunity to discuss your concerns directly — please call us at {phone}.").
Respond within 24-48 hours. Faster is better, but don't respond in anger. If a negative review arrives, sit on it for a few hours before drafting your response.
For an industry-specific deeper treatment of negative review handling — including in regulated industries like healthcare, financial services, and real estate — refer to the relevant industry guide.
Manual review request workflows work fine for businesses doing fewer than 30 transactions a month. Past that volume, the math changes.
The math is simple. A manual workflow depends on someone remembering to send a request after each customer interaction. Realistically, that someone forgets — or gets busy, or doesn't have the customer's contact info handy. The result is that maybe 15-25% of customers actually get asked. An automated workflow that fires off a request when a CRM, POS, or scheduling tool registers a completed transaction asks 100% of them, every time.
For most local businesses, the threshold where automation pays for itself is around 30-50 transactions per month. Below that, you can run a manual program and it'll work. Above that, you're leaving so many reviews on the table to manual forgetting that the automation pays for itself in increased review volume within a month or two.
What automation typically requires:
This is the part where review request software like TrueReview pays off — the integrations are pre-built (Jobber, Housecall Pro, ServiceTitan, Square, Acuity, LionDesk, and dozens more via Zapier), the templates are configurable, the timing is automatic, and the dashboard tells you which customers responded and which didn't. The setup is usually under an hour. After that, the system runs.
For a deeper comparison of the manual-vs-automated decision and the alternatives in the market, see our post on Google review management software, services, and tools compared.
A few patterns we see repeatedly when businesses start from scratch:
Setting up the profile but never claiming the review link. The profile exists, customers see it, but the business never extracted the direct review link to put on receipts, in emails, on QR codes. Months go by with the profile generating no reviews because customers never see a clear path to leaving one.
Choosing the wrong primary category. Your primary category is the single biggest signal Google uses to rank you in local search. Picking "Business" instead of "Plumber" can cut your visibility in half. Take time on this.
Filling out the profile incompletely. Half-finished profiles consistently underperform. Even fields that seem unimportant (services, products, Q&A) contribute to Google's evaluation of the profile's legitimacy.
Sharing a review link that doesn't work on mobile. Some older Google review URL formats had quirks on mobile devices. Always test your link on your own phone before deploying it widely.
Setting up the system and then never asking anyone. This is the single most common failure mode. The infrastructure exists; the asking never happens. Make the first review request part of your launch checklist, not something you'll get to "once we're settled."
Asking for reviews from friends and family on launch day. Even though they'd happily leave 5-stars, Google's algorithms can flag reviews from accounts with strong personal connections to the business owner, and these reviews can be removed. Worse, a sudden burst of 5-star reviews from accounts that have no other reviewing history looks suspicious to Google's anti-fraud systems.
Incentivizing reviews. "Leave us a 5-star review and get a discount on your next visit" violates Google's policies and can get your profile suspended. Don't do it, even informally, even to friends.
If you follow this guide, here's what should be in place after a focused setup session:
That's the foundation. From here, the review pipeline only requires consistency — asking every customer, responding to every review, refreshing photos and posts on your profile periodically. Within 60-90 days you should have your first 15-30 reviews, which is the threshold where the profile starts feeling credible to prospective customers searching for businesses like yours.
Ready to set up automated review collection so the asking happens consistently without you remembering? Start your free 14-day trial of TrueReview — automated SMS and email workflows, QR code generation, integrations with the CRM and POS systems most local businesses are already using, and a unified dashboard that brings reviews from Google and other platforms into one place. No setup fees, no contracts.